
Microscope for Rocks: Buy the Stereo One, Then Grind a Flat Face
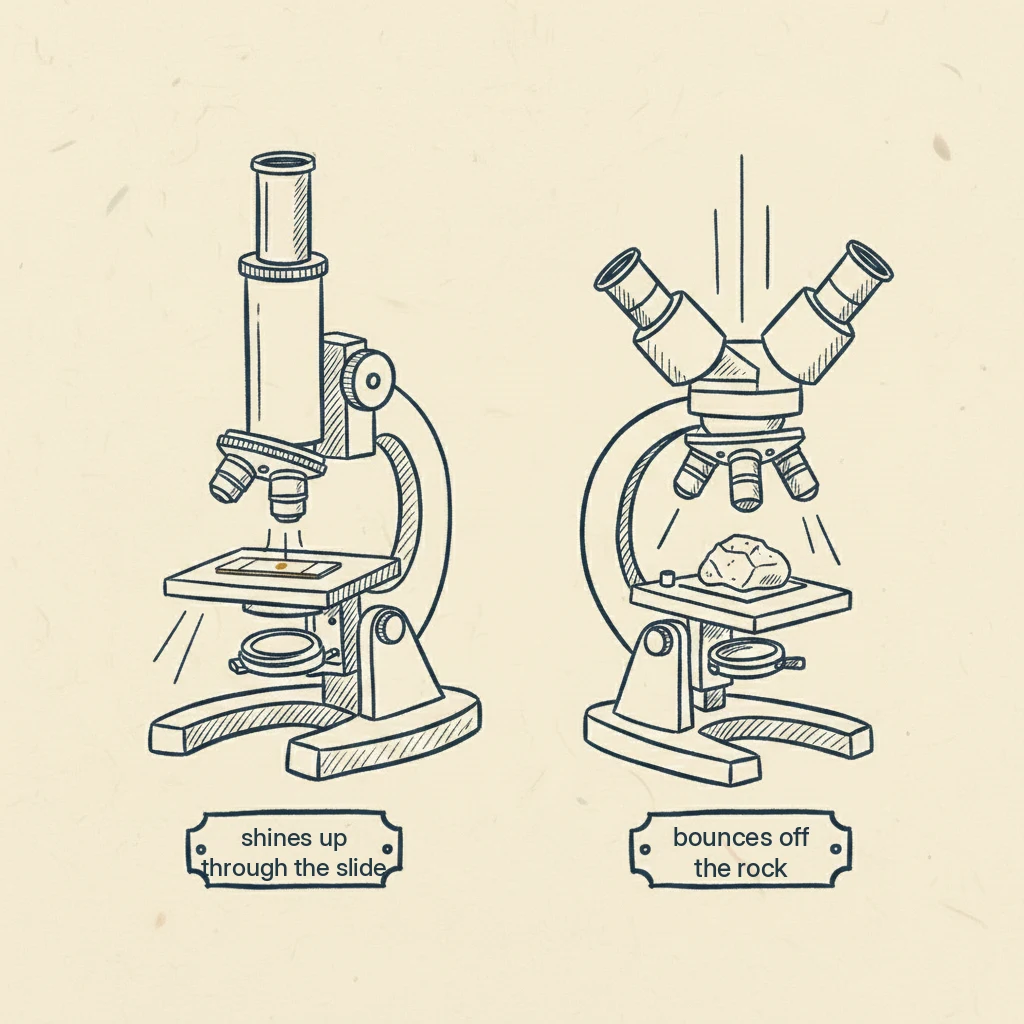
A rock is an opaque, three-dimensional lump, so you want a stereo microscope that bounces light off the surface and shows depth, not the school compound scope that shines light up through a thin slide. Useful magnification is low, a rockhound with a 180x scope works mostly under 90x. And the biggest upgrade you can make costs the price of sandpaper: grind the rock a flat face.
 Ray Ostrander · Updated July 24, 2026 · how I decide
If you buy through a link here, the site earns a little. It's never why anything gets picked.
I’ll be honest that this is home ground for me. I taught middle-school earth science for thirty-one years and put a hand lens into a lot of nine-year-old hands, and rocks under magnification is a thing I love. So here’s the answer, plainly. For rocks you want a stereo microscope, not the school-style compound one, and the reason is simple: a rock is an opaque, three-dimensional lump. Light can’t shine through it, so it has to bounce off the top, and you need to see depth, not a flat smear. A stereo scope does both. The compound microscope in every classroom and kids’ kit is built for the opposite thing, thin transparent slides with light coming up from below. And here’s the part that surprises people: useful magnification for rocks is low. A working rockhound with a scope that reaches 180x tells me he lives mostly below 90x. The single biggest thing you can do for what you see isn’t a better microscope at all. It’s a flat, polished face on the rock, made with sandpaper.
What's on this page
- Here's what's actually happening: which way does the light go?
- If you already own a compound scope, don't throw it out
- Why low magnification wins, from someone who does it
- The free upgrade that beats any microscope
- What you'll actually see
- What to actually buy
- Where Ray hands off
- Questions people actually ask
- Where I'd start with a shoebox of rocks
Here’s what’s actually happening: which way does the light go?
Everything about choosing a rock microscope comes down to one question almost nobody thinks to ask: which direction does the light travel?
The compound microscope, the tall one from science class, is designed to shine a light up through whatever you’re looking at. That’s why its samples are paper-thin and see-through, a smear of pond water, a sliver of onion skin, a prepared slide. The light passes through the specimen and up into your eye. It’s a wonderful instrument for the transparent world.
A rock isn’t transparent. Shine a light at the bottom of a rock and exactly none of it comes through the top. So the light has to come from above and bounce off the surface, which is precisely what a stereo microscope is built for. The microscopy society’s own guidance says it plainly: a stereo microscope lets you see depth in the image, which is useful for a rough piece of rock because the sample can be tilted to show its surfaces, and the light can be aimed to bring out specific features. Two eyepieces for depth, light from on top, room to tilt a chunky sample. That’s the whole case, and it’s why the stereo scope, not the compound one, is the tool.
If you already own a compound scope, don’t throw it out
Now, if you’ve already got a compound microscope, maybe you bought one for a kid, don’t go feeling you wasted your money, and don’t let anyone tell you it’s junk. The same society guidance says a compound scope can also be used on rocks, and it tells you exactly how: use a low-power objective, the x4 or x10, not the strong ones, and put a light source on top of the rock. A small LED on a bendy arm shining down does the job.
Read that again, because it runs against every instinct. On a rock, you want your weakest magnification, not your strongest, and you want the light above, not below. Turn the lamp around and dial the power down, and the microscope you already own will suddenly start showing you your rock instead of a black nothing. That fix is free.
Why low magnification wins, from someone who does it
Here’s the counterintuitive heart of it, in a real rockhound’s own words. He owns a scope that goes to 180x, and he says, “I find myself mostly viewing specimens in the sub 90x range.” Why would a man with 180x on tap use half of it?
His answer: “the depth of field on the microscope is a problem when viewing very 3D objects like rocks.” Depth of field is just the thickness of the slice that’s in focus at once. A rock is bumpy and deep, and the higher you crank the magnification, the thinner that in-focus slice gets, until almost the whole rugged surface is a blur and only a hair-thin band is sharp. A rock is about the most three-dimensional thing you can put under a lens, so it punishes magnification harder than almost anything. That’s why the number to reach for here’s low. On a rock, more power actively costs you.
The free upgrade that beats any microscope
If you take one thing from this page, take this, because it’s the most useful and it sells you nothing. The difference between a rock that looks dull under the scope and one that looks spectacular is almost never the microscope. It’s whether the rock has a flat, smooth, polished face. And you can make one with sandpaper.
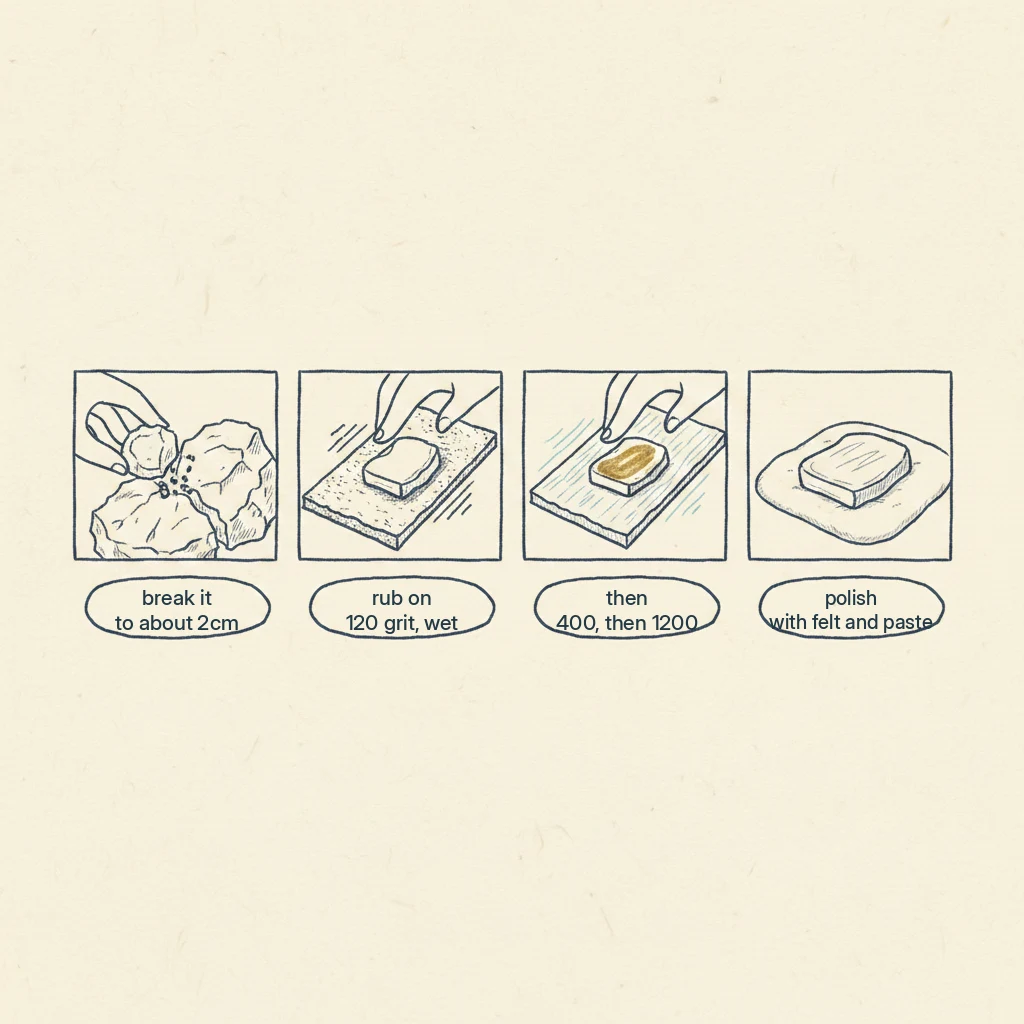
The society’s method is straightforward. Break off a small piece, about two centimeters across. Then wet a piece of fine abrasive paper, the automotive wet-and-dry kind, starting around 120 grit, and rub the stone on it in a circular motion until you’ve worn a flat facet. Work up through finer grits, 200 and 400, then a very fine 1200. To polish that flat face, a little automotive scratch-remover paste on a scrap of felt, rubbed in circles, brings it up. One lovely trick from the same source: if the polish still looks poor under the scope, lay a thin film of water on the surface and it often jumps into focus.
That’s the whole secret the shelf will never tell you, because there’s no product to sell. A ground, polished face turns a gray pebble into a window, and it costs the price of sandpaper. Grind the rock before you spend three hundred dollars on a scope.
What you’ll actually see
Let me set the expectation honestly, the way I always tried to for a class before I switched on the lamp, so nobody feels shortchanged.
You aren’t going to fill the eyepiece with a glossy full-screen crystal like the ones on the box. The society’s own photographs, labeled with their real scale, show a field of view only about five millimeters wide. But look what’s inside that little circle. A fossil about a millimeter across. Purple glassy garnet crystals locked in granite. In a polished limestone, tiny spheres called ooliths, each one built up in layers around a central speck. A gastropod shell and the remains of foraminifera, sea creatures, in a piece of stone. The view is small. What’s in it’s a three-hundred-million-year-old seabed, held in your hand. That trade, a few millimeters wide for a window into deep time, is one of the best deals in this whole hobby, and it beats any photo because it’s yours.

What to actually buy
The right class, a stereo microscope, is also the cheap one, which almost never happens. A Celestron Labs stereo scope starts around $50 for the S20, about $100 for the S1030N, and up to around $230 for the zoom model. Any of those does the rock job well.
Now look at the trap hiding in the prices. The compound scope, the wrong tool for rocks, starts around $150 for the Celestron CM800 and climbs past $300 for the bigger ones. So the wrong instrument costs three times the right one. For a rock, the fifty-dollar stereo scope genuinely beats the hundred-and-fifty-dollar compound, and that’s the whole buying decision in one comparison.
One real spec worth knowing: the rockhound I quoted chose his scope on a boom arm, the kind that reaches out over the bench, because, in his words, it “allows the viewing of rather large specimens.” A rock is bigger than a slide, and a cheap stereo scope on a short pillar stand can literally run out of room over a fist-sized chunk. If your rocks are big, look for a boom stand, and check the model can physically clear your samples before you buy.
And don’t overlook the humblest tool of all. The society notes that rocks can show interesting features under a simple hand lens, the same little loupe a coin collector carries. A hand lens is where this hobby starts, it costs a few dollars, and it goes in your pocket to the creek. You may not need a microscope at all to begin.
Where Ray hands off
I’ll be straight about the edge of my lane. Properly identifying a mineral, telling one from another for certain, is done with thin sections, wafer-thin slices of rock on a slide, viewed through a compound scope with polarizing filters that make minerals glow in identifying colors. That’s real petrology, a different and deeper neighbor’s workshop, and it’s not something I’m going to teach you from here or pretend a stereo scope does. The society describes a do-it-yourself thin-section route for the ambitious, so know that the door exists, but that’s a serious craft on its own.
And one firm line, the same one that governs this whole collector counter: this page shows you how to see your rock. It doesn’t tell you what it is, what it’s worth, or whether that glint is gold. Seeing and identifying are two different jobs, and a microscope only does the first one.
Questions people actually ask
What kind of microscope is best for rocks?
A stereo microscope. A rock is opaque and three-dimensional, so you need light bouncing off the top surface and two eyepieces that show depth, which is exactly what a stereo scope provides. The compound microscope from science class shines light up through thin slides and is the wrong tool for a solid rock, though it can be pressed into service with its lowest objective and a light on top.
How much magnification do I need to look at rocks?
Less than you’d think. A rockhound with a 180x scope reports working mostly below 90x, because a rock’s bumpy surface throws most of the view out of focus at high power. Low magnification with a well-lit, flat, polished face beats high magnification every time. Buy the number down, not up.
Can I use a regular school microscope for rocks?
You can, with two changes. Use its weakest objective, the x4 or x10, and add a light shining down onto the rock from above rather than relying on the built-in light from below. It won’t match a stereo scope, but it’s free if you already own one, and it turns a black, useless view into a usable one.
How do I see more detail in a rock under a microscope?
Grind it a flat, polished face. Break off a small piece, rub it flat on wet automotive sandpaper working from coarse to very fine grit, then polish with a little scratch-remover paste on felt. A thin film of water on the surface sharpens a rough polish. That flat face does more for what you see than any amount of extra magnification, and it costs the price of sandpaper.
Where I’d start with a shoebox of rocks
So here’s where I’d land, for anyone with a shoebox of rocks and a glint they want to chase. Start with a hand lens, because it’s a few dollars and it may be all you need. When you want more, buy the stereo scope, around fifty dollars, not the pricier compound one, and put your light on top. Then, before you blame the equipment for a dull view, grind one of your rocks a flat, polished face, because that one bit of effort will show you more than any upgrade on the shelf. What waits inside a five-millimeter circle, ancient shells, crystals, whole tiny seabeds, is genuinely worth the sandpaper.
If your collecting runs to coins or cards too, the same instrument questions come up at a microscope for coins and a microscope for cards, and the pocket tool that starts it all is covered at a magnifying glass for coins. Buying for a young rock hound? A microscope for kids is the gift-side page, and note the honest wrinkle: most kids’ kits are compound scopes, while rocks really want the stereo kind. And if a box ever waves a giant magnification number at you, the number on the box explains why the man who owns 180x uses 90x.
Ray Ostrander
Ray spent three decades explaining the sky to twelve-year-olds and their parents, and every January, hearing which Christmas telescopes ended up in the closet. He doesn't own a wall of gear and won't pretend to. He reads everything, tells you what owners agree on, and flags what's just his judgment. His goal is simple: no more January closets.